The LDR (Light Dependent Resistor) is the most common of the light sensors on the market, for years it has been used on top of streetlights to turn on the lamps at night and turn off during the day, and thus save energy and hence taxpayer money. So, let's see how to connect this sensor to the also famous Arduino.
The sensor
The LDR, as its name shows, is a variable resistor by light, which means that depending on the luminosity the value of the internal resistance in Ohm (R|Ω) will vary, from virtually 0R, when under strong light, up to about 200kR when in complete darkness.
 |
| Figure 1 - LDR and Arduino Uno |
The sensor
The circuit
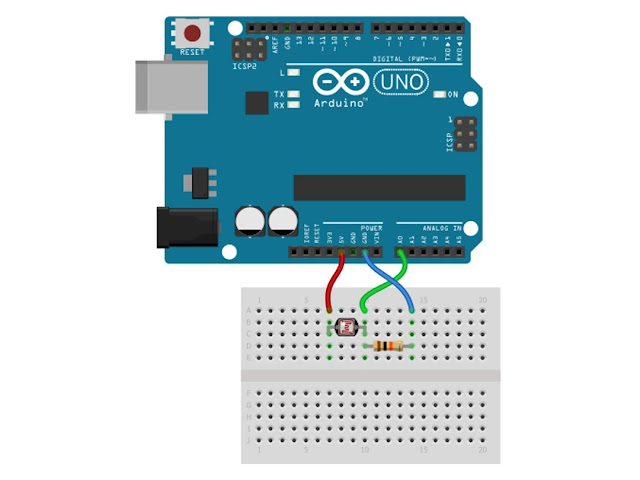
Understanding that the LDR is a resistor, and can virtually reach 0R, all we need is an Arduino analog port and a 100kR resistor to create a Voltage Divider and thus we can read the voltage, in this case it varies from 0V (0 in reading), when in total darkness up to 5V (1023 in reading, considering a 10-bit board of analog input resolution), when in great light. Necessary material:
- 1x - Arduino
- 1x - Protoboard
- 1x - LDR
- 1x - 100kR resistor
 |
| Figure 2 - LDR circuit with Arduino |
Follow Figure 2 to assemble the circuit.
The code
Basically the code prints if "it is dark", if the voltage received is below half of the threshold and "is illuminated" if equal or above the threshold.
LDR (Light Sensor) with Arduino
 Reviewed by AJ Alves
on
domingo, janeiro 15, 2017
Rating:
 Reviewed by AJ Alves
on
domingo, janeiro 15, 2017
Rating:


Nenhum comentário:
Postar um comentário